Flowers
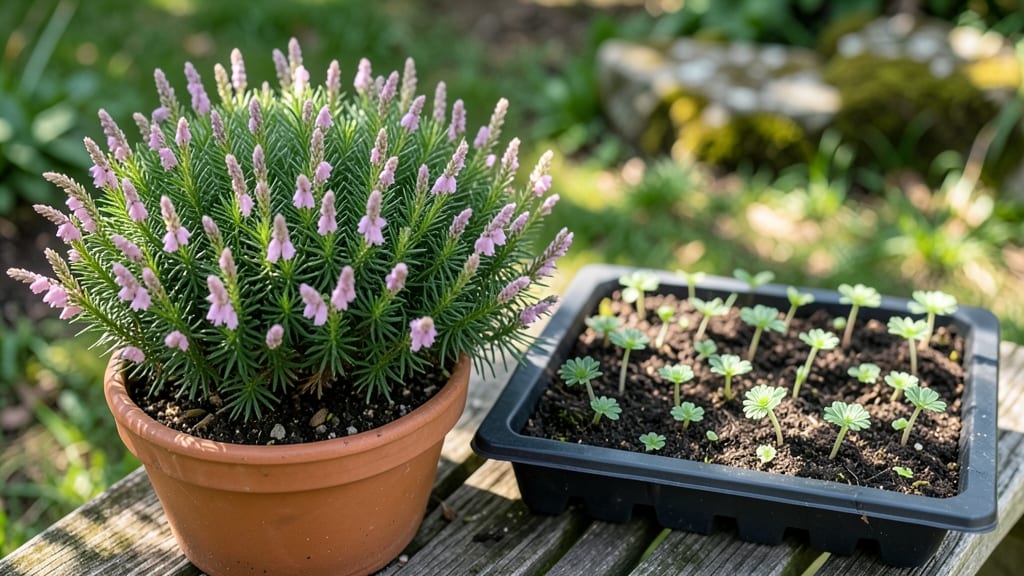
Growing heather flower seeds from scratch in the Pacific Northwest gives you year-round color that most plants can’t match—evergreen foliage in winter and delicate blooms from spring through fall. 🌿 I’ve watched my own heather bushes transform bare patches into lush, fragrant carpets that hummingbirds adore, all while requiring less fuss than most annuals.
The secret lies in mimicking their natural coastal habitat: well-draining soil, bright but indirect light, and patience with slow germination.
Start with seeds from a reputable supplier specializing in Pacific Northwest natives—they’ll thrive where store-bought varieties often struggle. You’ll need a shallow tray, sterile seed-starting mix, and a spray bottle for gentle watering.
Germination takes 4-8 weeks, so keep the soil consistently moist but never soggy, and place the tray in a cool (60-65°F) spot with bright indirect light. Young seedlings are delicate, so avoid disturbing them until they’ve developed their first true leaves.
Once they’re established, transplant to a sunny, wind-protected spot with sandy, acidic soil (pH 4.5-5.5). Heather loves dry conditions—overwatering is the fastest way to kill them.
By their second year, you’ll see those signature bell-shaped blooms in shades of pink, purple, or white, and the foliage will stay vibrant even when snow blankets the ground. The best part? They spread slowly but reliably, filling gaps naturally over time.
Common challenges include fungal issues from too much moisture and winter dieback in exposed areas. Solve the first with improved drainage, and protect young plants with a light burlap wrap during harsh winters.
Once mature, these plants become nearly indestructible—perfect for slopes, rock gardens, or containers where other plants might struggle. With the right approach, your heather will outlast every other garden trend you try.
📚 In This Guide
- What you need
- Instructions
- Tips and common mistakes
- Wrapping up and next steps
What you need
- ● Heather flower seeds: Choose Calluna vulgaris (common heather) or Erica varieties (e.g., 'Winter Bloom' or 'Golden Star'). Buy 1–2 seed packets (50–100 seeds each) for a small patch or 3+ packets for broader coverage.
- ● Well-draining potting mix: 2–3 gallons of a blend designed for acid-loving plants (e.g., peat moss + perlite + sand, or pre-mixed "ericaceous" soil).
- ● Seed trays or small pots: 4–6 shallow trays (2–3 inches deep) with drainage holes or biodegradable peat pots (2–3 inches in diameter).
- ● Clear plastic domes or plastic wrap: To create a mini greenhouse effect for germination.
- ● Spray bottle: For gentle watering (avoid over-saturating seeds!).
- ○ Garden gloves: Optional but helpful for handling soil and delicate seeds.
- ● Fine-mesh sieve or sifter: To lightly cover seeds (heather seeds need light to germinate—don’t bury them!).
- ● pH testing kit: Ensure your soil is acidic (pH 4.5–5.5). Heather thrives in acidic conditions!
- ● Outdoor space or grow lights: Heather seeds need bright, indirect light (6–8 hours/day). A sunny windowsill or grow light setup works.
- ○ Mulch (optional but recommended): 1–2 inches of pine bark or sphagnum moss to retain moisture and mimic heather’s natural habitat.
- ● Fertilizer (low-nitrogen, acid-loving formula): Apply once after germination (e.g., fish emulsion or iron chelate).
Step-by-step instructions for growing Pacific Northwest heather from seed
Here's my foolproof method for coaxing vibrant heather blooms from tiny seeds—tested across rainy seasons.
🌱 Step 1: Stratify Seeds for Successful Germination
Heather seeds need cold treatment to break dormancy. Place them in a sealed plastic bag with dampened peat moss and refrigerate for 4-6 weeks. Check weekly—they should feel moist but not soggy. This mimics winter's natural chilling period that triggers growth.
I like to label the bag with the date and variety. After 4 weeks, remove the seeds and let them sit at room temperature for 24 hours before sowing. This warm-up period prevents shock when they hit the soil. The stratification step is critical—skipping it results in poor or delayed germination.
🪴 Step 2: Sow Seeds in Acidic, Well-Draining Mix
Use a peat-based seed-starting mix (heather thrives in acidic soil). Fill small containers with the mix and press it down lightly to remove air pockets. Heather seeds are tiny—think 1/16 inch diameter—so I sprinkle them on the surface without covering. A light mist from a spray bottle ensures even moisture without burying the seeds.
Place the containers in a humidity dome or clear plastic bag to maintain moisture. Keep them in indirect light at 60-65°F until germination. You'll see tiny green shoots in 3-8 weeks, depending on seed freshness. Patience is key—some seeds may take longer, especially in cooler conditions.
☀️ Step 3: Provide Gentle Light and Gradual Acclimation
Once seedlings emerge, remove the humidity dome and move them to bright, indirect light. Heather dislikes harsh sun at this stage—too much intensity causes leaf scorch. A north-facing window or grow light 12 inches away works well. You'll notice the seedlings grow slowly at first; this is normal for heather.
After 4 weeks, introduce them to morning sun only for 1 hour daily. Gradually increase exposure over 2 weeks to 4-5 hours of filtered sunlight. This hardening process prevents shock when they transition to outdoor conditions. By 8 weeks, they should tolerate partial shade outdoors.
🌿 Step 4: Transplant to Acidic Soil with Proper Spacing
Choose a planting site with well-draining, acidic soil (pH 4.5-5.5). Heather hates soggy roots—amend heavy soil with peat moss or perlite if needed. Dig holes twice as wide as the root ball but no deeper. Gently remove seedlings from their containers, loosen the roots, and place them in the holes.
Space plants 12-18 inches apart for dwarf varieties or 24 inches apart for upright types. Water deeply after planting to settle the soil around the roots. Mulch with pine needles or sphagnum moss to retain moisture and acidify the soil further. Avoid fertilizing at this stage—heather prefers lean conditions.
⏰ Step 5: Maintain Moisture and Prune for Bushy Growth
Water heather deeply once weekly during the first growing season, allowing the top 1 inch of soil to dry between waterings. Overwatering causes root rot, while underwatering leads to stunted growth. You'll know moisture is right when the soil feels damp but not wet to the touch.
After the first year, prune lightly in late spring to shape the plant and encourage branching. Use clean, sharp shears to trim back 1/3 of the oldest growth. This step is crucial for maintaining a full, flowering form. Deadhead spent blooms throughout the season to promote continuous flowering—heather rewards patience with vibrant color from late spring to fall.
Tips & tricks for perfect heather flower seed germination
These subtle adjustments make all the difference when coaxing heather seeds to bloom—especially in our damp Pacific Northwest climate.
Stratification Precision: The 4-6 week cold treatment is non-negotiable, but here's the secret: use a paper towel between the damp peat moss and seeds to prevent mold. I place mine on a wire rack in a sealed container—this allows airflow while maintaining moisture. After the 4 weeks, that 24-hour room temperature warm-up is crucial; it's what triggers the metabolic shift needed for germination. I set my seeds on a heat mat during this period for consistent warmth.
Lighting Strategy: Heather seedlings are finicky about light—too much too soon causes leaf scorch. I use a grow light on a timer set for 12 hours daily, positioned 12 inches away. The gradual acclimation in Step 3 is key: start with morning sun only, then increase by 30 minutes every 3 days. I've seen seedlings that got too much sun too fast develop crispy edges within days.
Soil Science: That peat-based mix must stay acidic—aim for pH 4.5-5.5. I test my mix with a soil pH meter before planting. For extra insurance, I mix in a handful of sphagnum peat moss directly into the planting containers. Heather roots are sensitive to alkaline conditions, which is why our Pacific Northwest's natural acidic soils work so well for them.
Transplanting Technique: When it's time to move seedlings outdoors, I harden them off by placing them in a shaded outdoor spot for 2 hours on day one, then gradually increasing time. The key is to match the outdoor conditions—if it's rainy, cover them with a clear plastic dome. I've lost too many seedlings by rushing this process, so I always err on the side of caution.
Pro Tips for Heather Flower Seeds
- These subtle adjustments make all the difference when coaxing heather seeds to bloom—especially in our damp Pacific N...
- Stratification Precision: The 4-6 week cold treatment is non-negotiable, but here's the secret: use a paper towel bet...
- Lighting Strategy: Heather seedlings are finicky about light—too much too soon causes leaf scorch. I use a grow light...
Frequently asked questions
Got questions about growing heather flower seeds?
You’re not alone! Whether you’re a beginner or a seasoned gardener, these answers will help you cultivate stunning Pacific Northwest-friendly blooms with confidence.
When is the best time to plant heather flower seeds?
For the Pacific Northwest’s mild climate, sow seeds indoors in late winter (February–March) for early spring transplanting. If planting outdoors, wait until late spring or early summer (after the last frost) to avoid cold damage. Heather thrives in cooler temps, so avoid planting in scorching summer heat.
How often should I water heather seeds?
Keep soil consistently moist but not soggy—heather seeds need humidity to germinate. Water lightly daily (or mist) until sprouts appear, then reduce to 1–2 times per week once established. Overwatering can cause rot, so ensure pots have drainage holes!
Can I grow heather from seeds, or should I buy plants?
Yes! While mature heather plants are easier to find, growing from seeds is rewarding and cost-effective. Start with fresh, high-quality seeds (some varieties may take 3–6 months to bloom). For quicker results, opt for nursery-grown plants—but seeds let you experiment with rare cultivars!
Will heather survive the Pacific Northwest’s rainy winters?
Heather is drought- and cold-tolerant, making it perfect for PNW winters. Choose hardy varieties like Calluna vulgaris (hardy to Zone 4) and mulch lightly in heavy rain to protect roots. Evergreen heather even adds year-round greenery—no deadheading needed!
Why aren’t my heather seeds germinating?
Common issues include old seeds (use within 1 year), too-warm soil (keep temps 60–65°F), or poor drainage. Try a cold stratification trick: refrigerate seeds in moist peat for 4–6 weeks before planting. Patience is key—some seeds take 4+ weeks to sprout!
Still stumped? Drop your heather-growing hurdles in the comments—we’re happy to help!
Wrapping up and next steps
Growing heather flower seeds is a rewarding way to bring the charm of the Pacific Northwest into your garden year-round! With their hardy nature and vibrant blooms, these flowers are perfect for adding texture, color, and pollinator-friendly beauty to any space.
Whether you’re a seasoned gardener or just starting, now is the perfect time to plant and enjoy the magic of heather.
Ready to get started? Grab your seeds, pick a sunny spot, and let nature do the rest! 🌿💖 Plant your first batch today and watch your garden transform into a blooming paradise.